
In this tutorial I will show you how to install Raspbian and enable SSH on your Raspberry Pi without using a screen or keyboard. After you are done you will have a Raspberry Pi connected to your router, which you can access using your PC.
<a href=”https://tzeny.com/wp-content/uploads/2017/08/IMG_20170803_133231.jpg” data-rel=”lightbox-image-0” data-rl_title=”” data-rl_caption=”” title=””>
/a>
This is how my setup looks. So let’s get to it.
This tutorial is for Windows users. For Linux the only different part is the way you install Raspbian, which can be found here: https://www.raspberrypi.org/documentation/installation/installing-images/README.md
Parts used:
- Raspberry Pi 2
- A short LAN cable
- Micro USB power adapter with at least 1A output
- MicroSD card and MicroSD card reader
Software used:
- Raspbian (Jessie Lite)
- mRemoteNG
- Win32DiskImager
Setup
Installing Raspbian
Download Raspbian: https://www.raspberrypi.org/downloads/raspbian/.Pick whichever one you prefer (with or without desktop). If you pick the one with the desktop you can connect to it remotely and view the desktop.
Download and install Win32DiskImager: https://sourceforge.net/projects/win32diskimager/.After you download it install it.
Unzip your Raspbian image, and insert your MicroSD card into the card reader and that into the laptop.
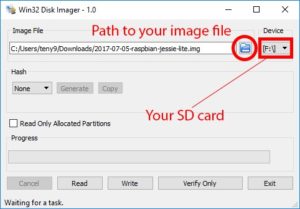
Open Win32DiskImager and select your image, and your SD card, then press Write.
<a href=”https://tzeny.com/wp-content/uploads/2017/08/write.jpg” data-rel=”lightbox-image-2” data-rl_title=”” data-rl_caption=”” title=””>
/a>
A popup will appear, press Yes and wait for the operation to complete.
Wait for it to complete then press Ok.
Enabling ssh
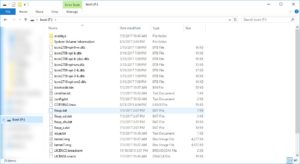
Open file explorer, and navigate to the drive labeled ‘boot’.
<a href=”https://tzeny.com/wp-content/uploads/2017/08/boot.jpg” data-rel=”lightbox-image-3” data-rl_title=”” data-rl_caption=”” title=””>
/a>
Create a file named ‘ssh’ (no extension).
I got the idea from here, kudos.
Starting the Raspberry
Take out the MicroSD card and plug it into your Raspberry.
Connect your Raspberry to your router with a LAN cable and then plug it in.
Setting a static IP
Navigate to your router’s IP address (usually 192.168.0.1 or 192.168.1.1) and login (user and password is usually admin and admin; change them afterwards if you haven’t already).
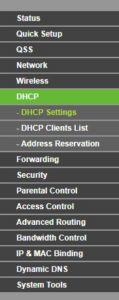
Pick DHCP clients list.
<a href=”https://tzeny.com/wp-content/uploads/2017/08/dhcp.jpg” data-rel=”lightbox-image-4” data-rl_title=”” data-rl_caption=”” title=””>
/a>
There you will see one named Raspberry (depending on your router the placement of the menu will vary).
Note down its IP and Mac, and go to Address Reservation.
Add a new entry, with the Raspberry’s Mac and IP(you can change this if you like).
Reboot your router if necessary.
Done
Done! Now you can always find your Raspberry Pi at the same IP address. You can connect to it using mRemoteNG or a similar tool.